Create a card design with our company badge maker
BadgeMaker Design, ID Card Software

Design your employee ID with our company card design software

Creating stunning professional employee IDs has never been easier thanks to our company card design software BadgeMaker Design, a core component of BadgeMaker. With BadgeMaker Design, you can create professional card designs tailored to your specifications, including backgrounds, dynamic fields, shapes, images, barcodes, signatures, and passport photos.

Step 1: Create a New Card Design

Start by launching BadgeMaker Design and initiating a new card design. Set your design preferences, including card format (standard CR80 or custom), single- or double-sided layout, Magstripe options, and portrait or landscape orientation.

Step 2: Add Background & Logo

Next, customize your card design with a background and logo. Choose from a selection of pre-designed backgrounds or create your own using the shape or image tool. Incorporate your company’s identity by adding your logo with ease. Simply use the image tool, click on the canvas, and select your logo image. Resize the logo as needed using the corner handlers.

Step 3: Incorporate Static & Dynamic Text

With the foundation of your design in place, it’s time to add text. Whether you need static text for simple designs like gift cards or dynamic text for cards with personalized information, BadgeMaker Design makes it simple. Maintain a consistent layout while accommodating variable data for each printed card.

Step 4: Personalize with Photos & Signatures

Take your card design to the next level by adding ID photo and signature placeholders. These placeholders automatically link to the cardholder ID photos and signatures in your BadgeMaker Identity project, ensuring seamless personalization.
Ready to get started? Download BadgeMaker today and unlock the power to create stunning card designs effortlessly!

Read More
ID Card Designer Add Static & Dynamic text
BadgeMaker Design, ID Card Software

BadgeMaker Design: How to add static & dynamic text

Thank you for choosing the ID Card Designer BadgeMaker, this post explains more about using the text tool and dynamic fields when creating your card design.

After creating the first steps of a card design, like the background and adding a logo it is time to add text to your card design.

You can make use of static text and or dynamic text. When creating a card design that does not contain any personalized data, like for example a gift card, static text can be used. When creating an ID card for your employees, dynamic data is needed for your card design. Typically, Dynamic data will change for every card printed.

In this example we create a design for an employee card, that displays the employee name, function, number and the expiry date of the card. The card design needs to be printed for thirty different employees.

You do not have to design thirty card designs and type in every card holders’ data by hand, we create dynamic fields so we can connect these dynamic fields to a data column that contains thirty names for example.

{A}

Step 1. Add {Dynamic Fields}

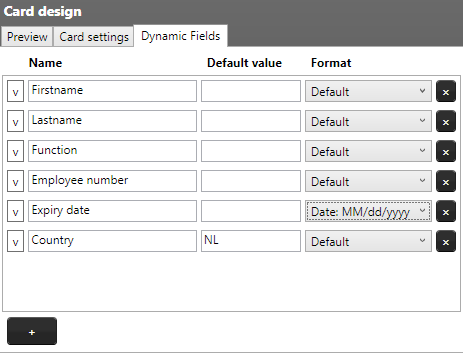
Go to the Card design view in BadgeMaker Design and click on the dynamic fields tab, click on the “+” button to add a dynamic field. In this example we create five dynamic fields. Next, we are naming the dynamic fields, so we know which data they represent.

The first dynamic field will represent the “Firstname”, the second the “Lastname”, the third the “Function”, the fourth the “Employee number” and the fifth the “Expiry date”.

ID Card Designer Add Dynamic Fields
ID Card Designer, BadgeMaker Design Dynamic Fields

Aa

Step 2. Add Static Text to your design

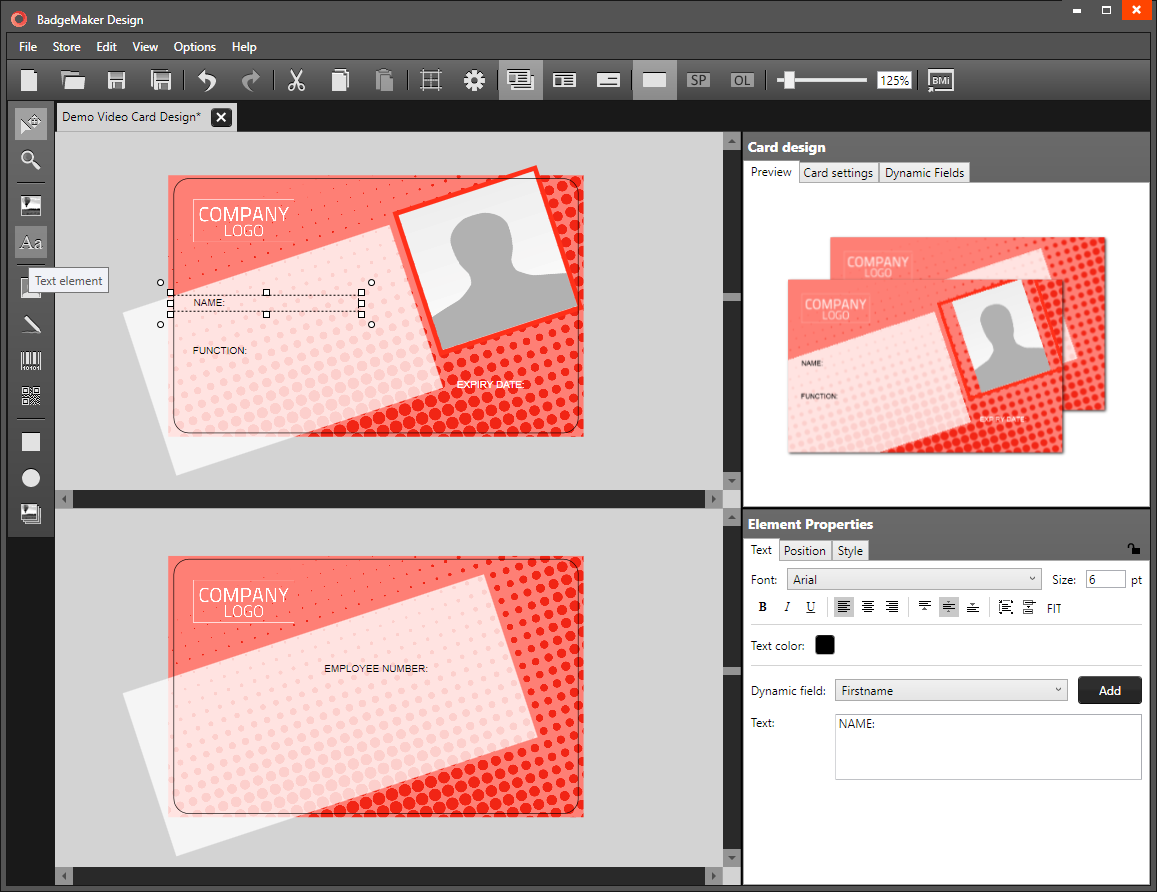
Now that we created the dynamic fields, we will use the text tool to add text to the card design. Click on the text tool, then click on the card and go to “Element Properties” to edit the text.

First create the static text labels, in this case “Name:”, “Function:”, “Employee number:” and “Expiry date:”.

ID Card Designer Text tool
ID Card Designer, BadgeMaker Design: Add Static text

{Aa}

Step 3. Add Dynamic text elements

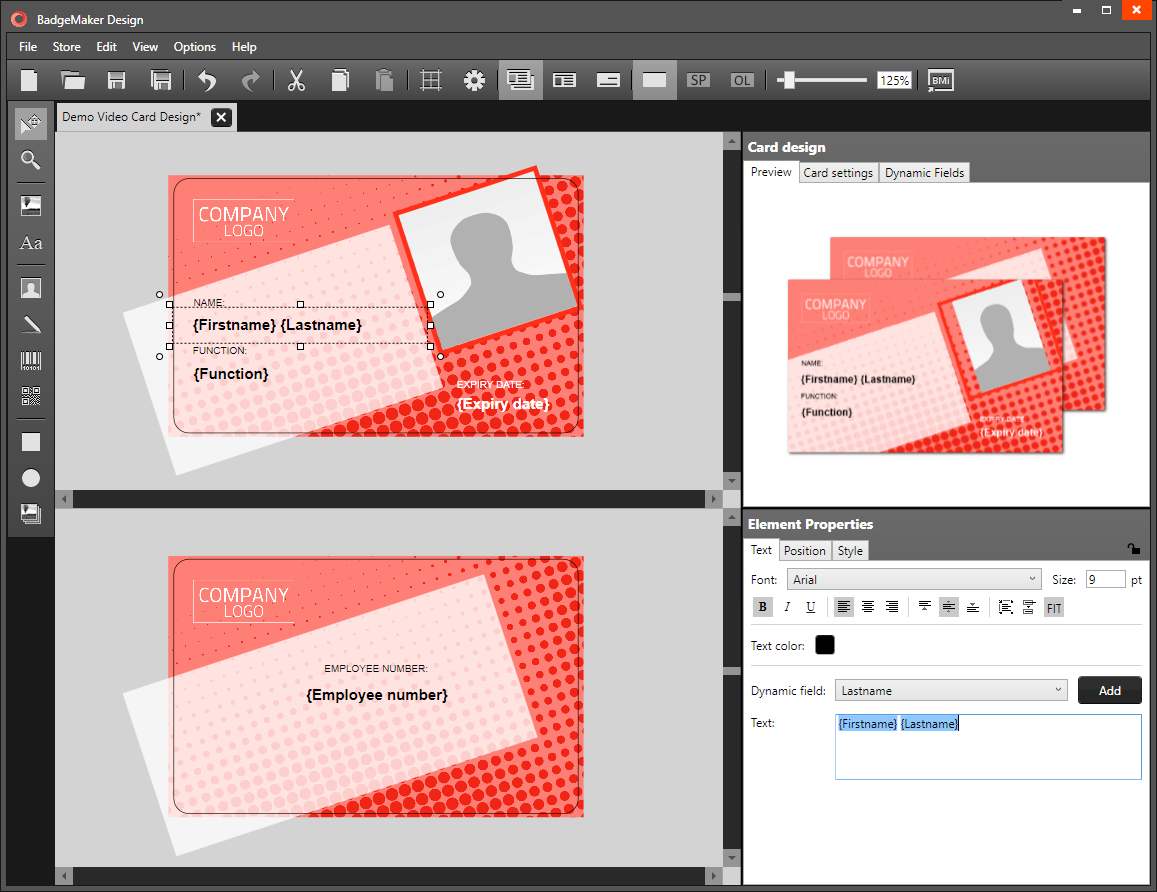
We also use the text tool for the dynamic text. You can use one text element for static and dynamic text, but for this design we want to give the text labels a different look from the dynamic data. Changing the font size and making the text bold.

Add Dynamic text elements using the dynamic fields, first select firstname from the dynamic field drop down menu and click on the add button. Do the same for the lastname, function, employee number and expiry date. You can recognize a dynamic field by the {braces} on each side of the word.

A nice personalized Card Design using images, shapes, static text and dynamic text created with BadgeMaker Design, the ID Card Designer.

ID Card Designer, Add Dynamic Fields to text
ID Card Designer, Add Dynamic text
Read More